Intro
I have several Xiaomi Mijia Temperature and Humidity BLE sensors laying around not fully utilized. When I bought them from aliexpress they worked just fine on the standard Xiaomi Home app, however, sometime later Xiaomi pushed an update so that they wouldn’t work with the standard international european app anymore. Either you used the chinese version (even more full of crap) or just couldn’t use the “smart” part of them. At that point, for me they became non-BLE sensors, since I could not use the Chinese apps as other IoT Xiaomi things that I have are european and thus don’t play well with the Chinese verison of the app.
Repurposing
Since we know that the sensors actually work, to gather their data one would just need a server and, coincidentally, not long ago I bought a mini-pc to use as a server, with proxmox allowing it to host a myriad of services. That’s how the idea came to fruition, just spin a Docker LXC in Proxmox to gather the data and while we are at it, lets also make it graph it and display it intuitively.
The Custom Firmware
These Xiaomi Mijia BLE sensors (specifically the LYWSD03MMC that I have) are great hardware for relatively low price. However, out of the box, they have a catch as they encrypt their Bluetooth broadcasts so that only the official Xiaomi app can read the data or, in general, don’t play nice with other protocols or receivers.
While you can technically extract a unique “Bind Key” for each sensor and feed it into your scripts to decrypt the Xioami data on the fly, it’s a tedious hassle. The standard is to flash the sensors with custom firmware, catch the unencrypted Bluetooth and read them normally. This does raise some security issues as you are broadcasting your own data but, given the nature of the data itself and the lower power of the sensors, I think it is relatively minor.
To flash the sensors you don’t need any breakout cables or fancy programming it is all really convenient. You just need to go to the Telink BLE OTA Flasher. There, you can connect to the sensor through Bluetooth. For that you will need Chrome, and most-likely (at least in my case it was) the #enable-experimental-web-platform-features flag as enabled (pasting chrome://flags/#enable-experimental-web-platform-features in chrome should take you there). From there, you just need to follow on-screen buttons and flows, registering the sensor first, doing a login and then flashing the firmware. Flashing is as easy as clicking a button and takes around a minute. After that, you can access a myriad of settings allowing you to tweak the device to add functionality, like changing whats displayed, or improve battery life by reducing measurments, etc.
The settings
Out of all the settings available there are two that were of relevance to me, the “Advertising type” and the “RF TX Power”
Advertising
This setting dictates exactly how the sensor packages its data payload when broadcasting over Bluetooth. As mentioned, the stock firmware uses a proprietary, encrypted format, but the custom firmware allows you to broadcast in several other standards, such as ‘Custom (pvvx)’, ‘ATC1441’, or ‘BTHome’. Since I didn’t want to go the route of the full Home Assistant (more on that later) I selected the pvvx.
RF TX Power
This setting controls the literal broadcast strength of the sensor’s Bluetooth radio, and it represents a direct trade-off between signal range and battery life. Thus, if you plan on setting the sensor far away from the receiver or separated by walls it may be best to increase it. In my case it was not so much the distance or the walls as the quality of the receiver. My Mini-PC has a metal casing and inside of it are the antennas for the combo M.2 Wifi and BL card, this has been documented to heavily decrease performance. Even after changing the original for a better one (the one it came with did not play nice with linux) the range is abysmall. It does not help its near a wall and a full metal tower PC. So to get the farthest sensor to be picked up reliably I had to crank that one up to +10db (we’ll see how much it affects battery life).
The server
As mentioned, the server is a mini PC running Proxmox. My target was to use a docker LXC with BL passthrough and call it a day. The first option would be to use Home Assitant, but since im not big on home automation or IoT for that matter I did not really see the point of going down this road as it would lead to bloat in my server. Thus the plan of a homemade Docker LXC was born
Learning when not to forward
Getting Bluetooth to work inside a Docker container on Proxmox took some trial and error (mostly errors). Before even dealing with Docker, the host couldn’t read the adapter. As it turns out, Proxmox doesn’t always have the Bluetooth stack fully set up by default, so I had to install it. After that, I tried (and failed) to pass the host’s Bluetooth adapter through to the Docker container (by setting network_mode: "host", making the LXC privileged, and mapping the D-Bus socket directly into the container).
In the end, after so many hurdles, I decided to go back and simplify. Nesting hardware passthrough from a Proxmox host into an LXC, and then trying to punch it through Docker’s isolation layer inside that LXC, creates a fragile house of cards that is guaranteed to break at some point (trying a GPU passthrough with Radeon graphics has me a bit scarred). So, to simplify and make it more robust (and to allow the database stack to be simpler) I decided to use message passing through MQTT. This way, instead of trying to shoehorn bluetooh into the LXC and the docker itself, I would leave that job to the Proxmox host (which natively sees the Bluetooth hardware without any mapping).
Setting up the Host Bridge
To make this happen, I installed TheengsGateway directly on my Proxmox, fast and easy. It natively reads the Bluetooth data from the sensors and converts them into neat JSON payloads which can then be sent through MQTT to the LXC.
Of course, even with this simplified approach, nothing works on the first try. When I fired it up, I was immediately greeted with an error stating that passive scanning on Linux requires BlueZ 5.56 or higher, compiled with the --experimental flag enabled. To fix this, I had to edit the systemd service for Bluetooth (/lib/systemd/system/bluetooth.service) and manually append --experimental to the ExecStart line. After a quick daemon reload and service restart, I could arleady see some signs of life, payloads were being decoded!
{"name": "ATC\_6EA90E", "id": "A4:C1:38:6E:A9:0E", "rssi": -59, "brand": "Xiaomi", "model": "TH Sensor", "model\_id": "LYWSD03MMC/MJWSD05MMC\_PVVX\_BTHOME", "type": "THB", "tempc": 23.82, "hum": 75.14, "batt": 95}
To finish the host part, I wrapped the TheengsGateway command into a persistent systemd service (/etc/systemd/system/theengs-gateway.service) so it would automatically start on boot (and restart if it ever crashed). The host side was done1, time to work on the LXC.
The Docker LXC
Since we are letting the Proxmox host handle the mess taht is the Bluetooth part, the LXC doesn’t need to be privileged or have any hardware passthrough. The stack inside the LXC is managed entirely with a single docker-compose.yml file and two small configuration files.
To keep things tidy, I set up a project directory (/opt/stack/) with the following structure:
-
./docker-compose.yml -
./mosquitto/config/mosquitto.conf -
./telegraf/telegraf.conf
Before running the stack, you must create the configuration files for Mosquitto and Telegraf. If you don’t, Docker will helpfully create empty directories instead of files, and Mosquitto will block all external traffic.
The Mosquitto Config (./mosquitto/config/mosquitto.conf) tells the broker to listen on port 1883 and allow our internal containers to connect without a password:
listener 1883
allow_anonymous true
persistence true
persistence_location /mosquitto/data/
The Telegraf Config (./telegraf/telegraf.conf) handles the data ingestion from MQTT to InfluxDB:
[agent]
  interval = "10s"

[[inputs.mqtt_consumer]]
  servers = ["tcp://mosquitto:1883"]
  topics = ["home/#"]
  data_format = "json"
  json_string_fields = ["name", "id", "model", "brand"]

[[outputs.influxdb_v2]]
  urls = ["http://influxdb:8086"]
  token = "mytoken123"
  organization = "home"
  bucket = "sensors"
Finally, the docker compose should look something like this:
services:
  mosquitto:
    image: eclipse-mosquitto:2
    container_name: mosquitto
    ports:
      - "1883:1883"
    volumes:
      - ./mosquitto/config:/mosquitto/config
      - mosquitto-data:/mosquitto/data
    restart: unless-stopped

  influxdb:
    image: influxdb:2.7
    container_name: influxdb
    ports:
      - "8086:8086"
    volumes:
      - influxdb-data:/var/lib/influxdb2
    environment:
      - DOCKER_INFLUXDB_INIT_MODE=setup
      - DOCKER_INFLUXDB_INIT_USERNAME=admin
      - DOCKER_INFLUXDB_INIT_PASSWORD=adminpassword
      - DOCKER_INFLUXDB_INIT_ORG=home
      - DOCKER_INFLUXDB_INIT_BUCKET=sensors
      - DOCKER_INFLUXDB_INIT_ADMIN_TOKEN=mytoken123
    restart: unless-stopped

  telegraf:
    image: telegraf:1.30
    container_name: telegraf
    volumes:
      - ./telegraf/telegraf.conf:/etc/telegraf/telegraf.conf:ro
    depends_on:
      - mosquitto
      - influxdb
    restart: unless-stopped

  grafana:
    image: grafana/grafana:latest
    container_name: grafana
    ports:
      - "3000:3000"
    volumes:
      - grafana-data:/var/lib/grafana
    restart: unless-stopped

volumes:
  mosquitto-data:
  influxdb-data:
  grafana-data:
Bringing it Up
Once the three files described above are in place, you can bring up the stack with a sinmple docker compose up -d . All four containers should spin up in the background. Because Mosquitto is configured to allow anonymous internal connections and Telegraf is listening to the home/# wildcard, the data pipeline starts working immediately, althouhg depending on polling rates for the sensors the data may take some seconds/minutes to be sent.
Once you confirm that the data is being sent and received correctly, which can be done with
docker exec -it mosquitto mosquitto_sub -t "home/#" -v
we can proceed to the next step, tunning the visualizatin in Grafana.
Visualizing with Flux in Grafana
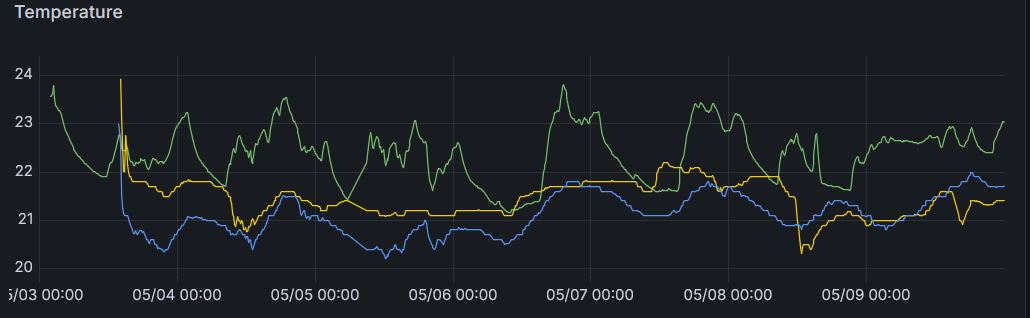
Even with multiple sensors funneling data into InfluxDB under the exact same measurement type, graphing them in a way that is not confusing, just requires a small amount of code in Grafana.
I wanted all of the sensors in a single graph, color-coded, so I could get an “at-a-glance” read on the state of the house (temperature and humidity-wise). However, InfluxDB tracks each sensor by their MQTT topic, which includes their MAC addresses making default graphs kind of ugly. I used InfluxDB’s Flux query language and the map() function to intercept those MAC addresses and rename them on the fly so as to get human-readable graphs. This way, we can rename the sensors to something easier to understand:
from(bucket: "sensors")
  |> range(start: v.timeRangeStart, stop: v.timeRangeStop)
  |> filter(fn: (r) => r._measurement == "mqtt_consumer")
  |> filter(fn: (r) => r._field == "tempc")
  |> map(fn: (r) => ({r with topic:
      if r.topic == "home/TheengsGateway/BTtoMQTT/A4C1386EA90E" then "Escritorio"
      else if r.topic == "home/TheengsGateway/BTtoMQTT/A4C13840D65B" then "Salón"
      else if r.topic == "home/TheengsGateway/BTtoMQTT/A4C1387F84D8" then "Habitación"
      else r.topic
  }))
  |> keep(columns: ["_time", "_value", "topic"])
Addying extra sensors would only require an extra else if for each one, so relatively simple.
The results should look something like this: